Record Forms are similar to NetSuite forms, but they are much simpler and compatible with SuperSync Email for Outlook. You can customize record forms in NetSuite and use them to create Customer, Contact, or Lead records from the add-in.
This process must be completed by a NetSuite Administrator.
As an administrator, you can enable different record forms for users on a profile-by-profile basis. Click here to learn how to customize profiles.
To customize a record form, go to Customization → List, Records & Fields → Record Types and click on List to the right of the SuperSync Email Record Form. Once the list of forms is open, edit the form that you’d like to customize.
Out of the box, SuperSync Email for Outlook automatically created these record forms when you installed the add-in.

Every SuperSync Email for Outlook account has different forms. Please note that the forms you see on this example are different from those you'll see on your account.
Once you open the form you'd like to customize you'd see the following fields:

1. Name
This is the name displayed on the Record Form. The name will be displayed both internally to a the NetSuite admin as well as externally to users unless there is a value for Display Heading below.
2. Inactive
If this checkbox is enabled, the integration will act as if this form doesn’t exist anymore.
3. Display Heading
Adding a display heading will overwrite the name that the user will see in the add-in.
4. Record Type
Use the drop-down menu to select the record type associated with the form you are customizing.
1. Fields
This controls which fields get displayed in the New Record Form in the add-in. To select or deselect a field, hold the Ctrl key (or Cmd key on Mac) on your keyboard while clicking on the text.
As mentioned before in this article, SuperSync Email for Outlook automatically created these record forms when you installed the add-in. Therefore, it included all the mandatory fields by default.

Field Naming Syntax
Field Name: Default Value (Display Type)
Special Fields
Custom Form
Out of the box, you will notice that there is a Custom Form field for each Record Form. Each one has a default value of the original entity form. Each one is also set to hidden, so that the user does not see the field on the form. The Custom Form field is needed in order to tell NetSuite which entry form to use when creating the record. If no Custom Form field is selected on the Record Form, whatever entry form is set to preferred will be used instead. The preferred form might not have all the same mandatory fields that the current form has. If it doesn’t, then NetSuite will display an error stating not all mandatory fields were filled out. It’s important to always have a Custom Form field set on all Record Forms.
Is Person
This Record Field references a standard NetSuite field that is used behind the scenes. It controls if a Lead or Customer is either a company or individual. Out of the box, you will notice that there is an Is Person field for each Customer and Lead Record Form. On the company version of the Record Form, the Is Person field is unchecked by default, which will let NetSuite know to create the entity record as a company. On the individual version of the Record Form, the Is Person field is checked by default, which will let NetSuite know to create the entity record as an individual. It’s important to always have an Is Person Record Field set on all Lead and Customer Record Forms. If one isn’t set, NetSuite will create the entity record as a company by default.
Customer ID / Lead ID
If you see one of these fields, unselect it from the list. It’s value is always automatically generated based on the First Name and Last Name fields for individual or Company Name field for company. The value for the field needs to be unique within NetSuite, so it’s easiest to just let the integration handle it.
Field Order
Here, you can control the order in which the fields are displayed.
Click the "X" to remove a field from the list.
Click and drag the six-dots icon to move a field up or down to change the order.

To create a new field and add them to the Record Form, click on the plus "![]() " symbol.
" symbol.

A new window will pop up where you can enter the information to create the new field.
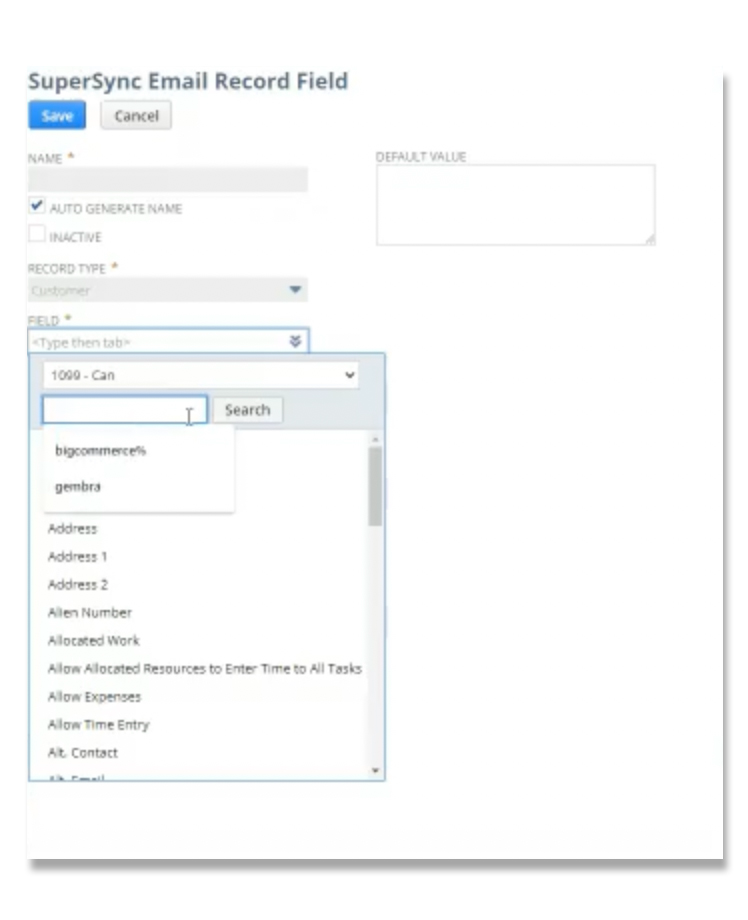
Complete Required Fields
Name: This is the name displayed on the Record Form. Display Heading, this field replaces the Name field only in the add-in.
Record Type: use the drop-down menu to select the record type associated with the form you are customizing.
All the changes you make to your Record Forms in NetSuite will be reflected in the add-in. Here is an example of how it'll look for you.

By default, the Administrator (Full Access) Profile has all Record Forms selected. All other default Profiles have none selected. If no Record Forms are selected, the New Record button will not display in the Outlook add-in.